Sobel Outline with Unity Post-Processing

- Overview
- Sobel Operator
- Sobel Outlines as a Post Processing Effect
- Excluding from the Outline
- Other Sobel Applications
- Source Code
- References
- Changelog
Overview
In my last ramble we looked at how to setup and create our own post-processing effects within the Unity deferred rendering pipeline. As an exercise we implemented a rudimentary outline effect called Surface Angle Silhouettes, however this approach has several key disadvantages such as it does not work for flat surfaces and requires a rounded model.
This time we will be using the Sobel operator to produce more accurate outlines which can be applied to nearly any model and scene. It still has some disadvantages but it is a better general-purpose outline than surface angle silhouettes. It is also a computationally cheap effect which scales constantly with screen resolution, making it easy to evaluate any performance impact.
Sobel Operator
The Sobel operator is a classic edge detection convolution filter used for decades in computer graphics. We will be using a very basic uniform 2D version of it, but it can be easily modified for more specialized purposes such as focusing on a specific axis, calculating gradient direction, or extended to 3D.
To put it simply we sample the four side neighbors of each fragment and sum the differences of the sampled properties. A small difference indicates that the surface is consistent and that we are most likely not on an edge, whereas a large difference indicates an abrupt change in the sampled properties and we are likely on an edge pixel.
The function we will be using to calculate the Sobel difference can be expressed as:
Where,
- s is a texture sample, where the subscript specifies the direction
- center, top, bottom, left, right
- multiplier is a scalar input control parameter to linearly influence the value
- bias is a scalar input control parameter used to reduce noise artifacts in the final result
Sobel Outlines as a Post Processing Effect

For our post-processing outline we will be sampling two scene properties: depth and surface normal. As shown in the image above the depth values typically perform better for outside edges, particularly if the surface is flat, whereas the normals perform better for interior or rounded edges.
To implement this effect we will create a new PostProcessEffectRenderer implementation and HLSL shader. We will be following the same process that was covered in the previous ramble, Surface Angle Silhouette with Unity Post-Processing. It should be noted that while the effect class is specific to Unity the resulting shader may be adapted for any engine or pipeline.
Outline Settings and Renderer
We will expose the following control parameters which will give us a large degree of control over our outlines.
- Outline Thickness the distance that our Sobel operator will sample from the central fragment. Keep in mind that this is not a direct pixel-width outline size.
- Outline Color the RGBA color of the outline (where we blend the outline with the scene if A is not 1.0).
- Depth Multiplier a scalar value that we will multiply our depth Sobel value with. Used to increase or decrease the outline contribution from the depth samples.
- Depth Bias a scalar value which we will raise the depth Sobel value to. This is extremely useful for removing noise artifacts from the outline.
- Normal Multiplier same as the Depth Multiplier but for our normal samples.
- Normal Bias same as the Depth Bias but for our normal samples.
First we need to create a new SobelOutline.cs file within our Unity project. Within this file we will place our PostProcessEffectSettings and PostProcessEffectRenderer implementations. When creating these classes there is a bit of a chicken-or-the-egg issue in which each one requires the other, but we will start with the settings class.
|
|
Note that we specify our effect’s injection point to be BeforeStack. This is done so that our outlines are affected by the built-in effects that come with the post-processing package, which includes multiple anti-aliasing implementations.
Then within our same file we create our minimal PostProcessEffectRenderer implementation:
|
|
We can now add our SobelOutline effect to a global PostProcesVolume component within the Unity Editor. Nothing will happen at this point other than Unity complaining that our shader can not be found.
Outline Shader
With the effect classes complete we can move onto our shader which will be covered in three sections: depth-based outlines, normal-based outlines, and then combining them. For these sections we will only show new or modified portions of code while the entire shader is available in the Complete Source Code section.
To begin, create a new shader within Unity named SobelOutline.shader and paste the following skeleton into it:
|
|
We now have a CG shader program invoking an HLSL fragment shader that turns our entire scene green.
Depth-Based Outline
To determine whether a fragment lies on the edge of an object we will use our Sobel operator to calculate a depth differential. This differential is calculated from the sum of neighboring fragments and then used to interpolate from the scene color to our outline color.
First we will define our input variables, some provided by Unity and the rest by our effect settings class.
|
|
Here _CameraGBufferTexture2 is the standard deferred pipeline buffer which contains our scene’s normal values. A full breakdown of what GBuffer correlates to which dataset can be found in the Unity documentation under Deferred Shading Rendering Path.
With all of our shader’s input defined we can write the main fragment program. To start, let’s perform our Sobel sampling of the depth texture and visualize the results. This will let us gain an understanding of what we are really working with before moving onto overlaying the outlines onto the scene.
|
|
This calls into our SobelSampleDepth function which we will define next. Within this function we will sample the depth texture a total of 5 times: center, left, right, top, and bottom. We then sum the absolute differences between each side and the central fragment (the one on which the program is currently operating on).
Take note of the use of the utility LinearEyeDepth function which is used to decode the high precision value stored within the Unity depth texture.
|
|
We could sample any number of neighboring fragments. This could be a single neighbor, such as the top neighbor in order to only draw horizontal outlines, or 8 neighbors, or even 24 while reducing contributions based on distance to the central fragment.
However, we sample 4 because it is the fewest number of samples needed to generate accurate outlines in all directions. If we wanted to sample 8, by adding the neighbor corner fragments, the resulting outline isn’t too noticeably improved for doubling the number of samples required. This is shown in the image above.
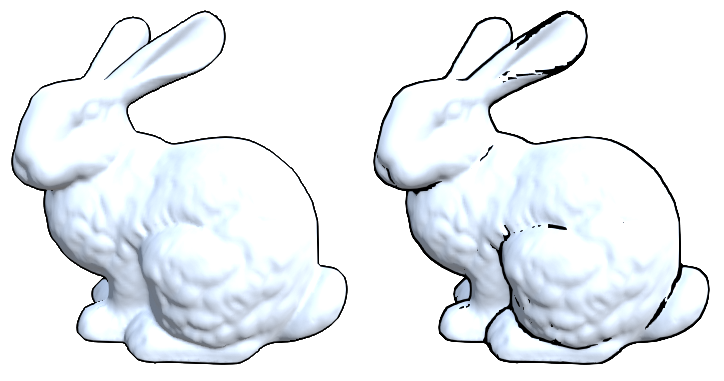
Our post-processing effect should now produce a result similar to the one below, where white pixels illustrate where our outlines will be.

In order to convert the raw Sobel depth value to an outline we will interpolate between the scene and outline color using it as the fractional value.
|
|
We have our outlines now but we have some noisy artifacts within the model. This is where our control parameters, _OutlineDepthMultiplier and _OutlineDepthBias, come in handy. The multiplier parameter can be used to perform a straight-forward scaling of the value, which is especially useful for scenes with distant far clipping planes, and the bias can be used to remove the noise artifacts.
Modify our sobelDepth value to use the control parameters:
sobelDepth = pow(saturate(sobelDepth) * _OutlineDepthMultiplier, _OutlineDepthBias);And our depth-based outlines are now complete.

Normal-Based Outline
Moving onto the normal-based outlines we will see the process is nearly identical to that used by the depth outlines. The primary difference is our normals are not simple scalar values but instead are three-component vectors.
To begin, let’s add a new function which will perform a Sobel sample on a generic texture:
|
|
This is nearly identical to SobelSampleDepth but we return the entire vector and we do not need to decode the stored values.
Next, lets update our fragment shader to output the result of the normal sample like we did for the depth sample. It should be noted that we perform the Sobel operation on the raw normal stored within the buffer, whose components are on the range [0.0, 1.0]. Since we are dealing with only value differences it does not matter whether the components are from [0.0, 1.0] or [-1.0, 1.0].
|
|

Interesting, but we want to sum the vector components so that we will have a single scalar value for the normal outline.
|
|

And just like with our depth outlines we can use our input control parameters to fine-tune the result.
sobelNormal = pow(sobelNormal * _OutlineNormalMultiplier, _OutlineNormalBias);Combining the Outlines

At this point we have separately calculated outlines for both depth and normal values. The final step is to combine them and use the combined value as the outline fractional.
|
|
Enabling Anti-Aliasing

The Sobel outline itself is not anti-aliased and thus your personal results may look blocky and pixelated. This can be alleviated by enabling an anti-aliasing post-processing effect on your camera’s PostProcessLayer component such as Subpixel Morphological Anti-Aliasing (SMAA).
Excluding from the Outline
Occasionally you may need to exclude geometry from the outline effect. In Realms, we exclude both water and grass from the outline but approach it in different ways.
For forward effects, we make use of a custom OutlineOcclusionCamera which can be configured to render certain geometry. This camera writes the depth values of the selected geometries to a _OcclusionDepthMap which is provided to the Sobel shader. The implementation of this camera is demonstrated in the GitHub repository.
For deferred effects, such as the grass shader, we set a signal flag in the form of setting the .w of the normal vector to 0.0, which we then interpret in the Sobel shader as meaning “ignore this fragment.” It is crude, but gets the job done.
Other Sobel Applications
Sobel Blur

As noted earlier, the Sobel operator can be used for numerous applications and is not limited to creating outlines. Another application is creating an uniform scene blur which evenly affects the entire camera. This can be implemented easily using our outline effect as a guide. All we must do is perform a Sobel sample on the scene buffer and output the result.
|
|
_SinTime is a useful input provided by Unity which can be used to perform animation in a loop. Using this we are given a value on the range [0.0, 1.0] which modulates over time:
(0.0, 0.1, ..., 0.9, 1.0, 0.9, ..., 0.1, 0.0)
For more information, and other helpful shader inputs, see Unity Docs: Built-in shader variables.
Normal Map Generation

The Sobel filter can also be used to generate normal maps from other textures such as height maps.
|
|
Where strength is a multiplier that can be used to increase or decrease the intensity of the normals.

Source Code
 See the code on GitHub: https://github.com/ssell/UnitySobelOutline
Written against:
- Unity v2020.2.0f1
- Post Processing v2.3.0
References
- Silhouetting by Image Processing, pp. 517-522, Real-time Rendering, 3rd Edition
- Post Processing in UE4: Cel-Shading
- Dragon model is sourced from: http://graphics.stanford.edu/data/3Dscanrep/
- UV-Unwrappd Stanford Bunny model is sourced from: https://blenderartists.org/t/uv-unwrapped-stanford-bunny-happy-spring-equinox/1101297
- StackOverflow answer regarding using Sobel for normal maps.
Changelog
2021-11-29
Adding the “Normal Map Generation” section.
2020-12-23
Added code and sample project to GitHub. This includes a CG implementation of the effect as well.
2020-09-09
Apparently the shader was broken. Oops.
2020-01-09
Updated to reflect changes made to the Unity shader function LinearEyeDepth in the com.unity.postprocessing package, v2.1.7.
This function was changed so that it’s input/output is now a float and no longer a float4.